Eye Shadow is the most FUN part of make up. Playing with different colors is fun, but it’s not fun when you feel lost or have no clue where to place the eye shadow. Eye shadow placement is very important because who wants to be putting on eye shadow the wrong way! Hahaha trust me I use to commit this crime A LOT!!! :0) I use to have no clue where to place my eye shadow but now I do. And once you learn how to place the eye shadow in the correct places and you learn how to blend, than you’re a PRO! So, today I’m going to show you the basic eye shadow placement on a look I did back in march.
So, let’s began….
Q: I don’t quite know where to place eye shadow on my eyes?
A: There are so many places where to apply eye shadows, but here is an example of a simple and basic way. Keep in mind that everyone eye shape is different. We all have the same parts but different locations. This is a basic way for beginners to start out.
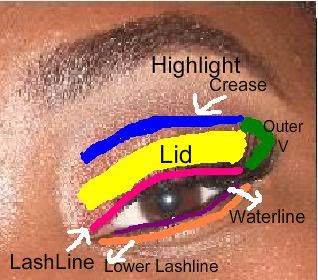
Basic Eye Shadow Application Map

LID (Yellow)
The lid is where you place varies of colors, like orange, Pink, Purple, and maybe even Blue. This is where you have the most fun because you can choose any color to go on the lid.
CREASE (Blue)
The crease can be found by looking or feeling for the line right above your lid, that is where your natural crease is. In the crease a transition color is placed here to blend with the highlight color. A transition color is usually a light or medium brown.
HIGHLIGHTER
The highlighter is directly under your eyebrow. The color placed here can range from any neutral shade that goes with your skin tone or a concealer that is one shade lighter than your skin tone. But please NO WHITE!! I see so many Women of Color make this mistake and apply a WHITE eye shadow as a highlighter.
OUTER V or OUTER CORNER (Green)
The outer v is the area where you make a side ways “V”. The top leg of the v connects to the crease and the bottom of the v connects to your lashline. In the outer v this is where you apply a dark color like, Black, Brown, or Purple that can smoke out your look.
TOP LASHLINE (Hot pink)
This is where your skin and eyelashes meet. This is where you apply your liquid, pencil, or gel eyeliner. When applying eyeliner you want to apply it as close to the lash line as possible.
WATERLINE (Purple)
This is where you apply a black or brown pencil eyeliner to deepen up your makeup and complete the look or you can add white eyeliner to brighten up the eye and appear to make it look larger.
LOWER LASHLINE (Orange)
This is an area that is optional to leave bare or you can apply eye shadow. The same color eye shadow that you applied to your lid is the same color you re-apply but a thin line of color to your lower lash line.
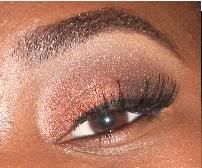
Here is the finish eye:

• I used a peachy-gold eye shadow for my highlight.
• For my Crease color I used a light brown eye shadow as my transition color
• I use a copper eye shadow all over my lid
• To darken up my outer v I used a matte black eye shadow and dragged it up into my crease
• A black gel liner was applied to my top lash line and a black pencil eyeliner was applied to my waterline to frame my eyes
• (This step is optional) I usually apply the same eye shadow to my lower lash line but for this look I didn’t because it was daytime and I usually only do that step at night.
The steps I mentioned are just a basic way to apply eye shadow to your eyes. You can substitute whatever color you like, you don’t necessarily have to use the same colors I did.
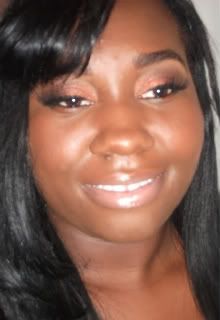
Here's the complete look:

Eyeshadow plcement tip:A simple tip you can follow is always using a darker color on the crease and lighter color on the lid.
I really hope this post was helpful for you Dolls! Let me know if it was, I would love to hear your honest opinions and comments because they matters to me.
Have a blessed day and thanks for stopping by!
‘till next time Dolls!
Xoxo
keisha

3 comments:
I love the look you did with this!
@Tina Marie
Thank you Tina
Hi Queenie Keisha,
I just really wanted to thank you so much for your basic makeup tutorial on your blog! I'm 21, and I really haven't had much experience with makeup. I am so glad that I found your blog! Your makeup tutorials are so simple, but also so beautiful! Because of your help, I now receive so many compliments on my makeup!
Thanks again!
A grateful college student
Post a Comment